Crocheted Light Green Sweater
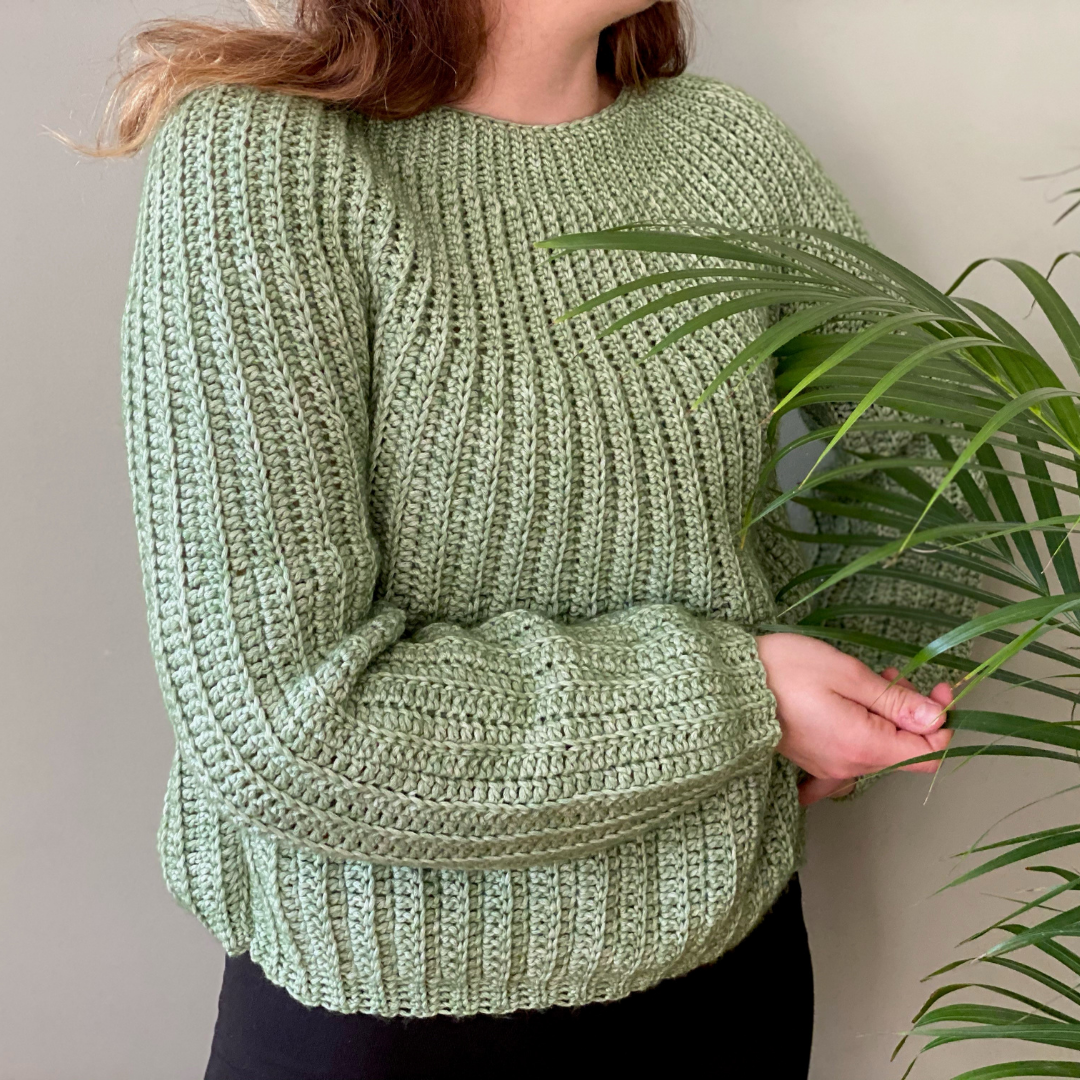
The light-up jumper is a nice warm and fluffy jumper, made with Infinity Hearts Lily.
The jumper is crocheted in one piece lengthwise and then sewn together at the end. You mainly crochet in the back loop only. It's an easy crochet pattern to follow and includes pictures to help guide you.
When you finish the row of sl st, you make a ch before you turn the work - this is the collar of the jumper. When you finish the row with dc, you turn before making a ch - this is the bottom of the jumper. The reason I do it in different ways is that the rows look nicer with these finishes.
A good tip for not having to count the stitches all the time is to place a stitch marker where the new crochet technique starts e.g. when htr begins.
If you have any questions about the pattern or need help with crocheting your jumper, feel free to dm me on Instagram @lisettelannerhag, and I will be happy to help you.
If there is only one number in the description, then the number of stitches is the same for all sizes. Otherwise, just follow the number of stitches for your size. Tip: Mark the size you are making with a highlighter to create a better overview of the pattern.
Sizes
XS (S) M (L) XL (XXL)
Measurements
Length: 50 (55) 55 (55) 60 (62)cm
Width: 49 (49) 56 (63) 63 (68)cm
Sleeve: approx. 75cm
Materials
Crochet hook: 5.50mm.
Or the size you will need to get the right crochet tension:
4 blo should measure 5cm in width.
7 blo should measure 5cm in length.
Check your crochet tension to get the size right. You might need to go one crochet hook size up/down.
Other materials: Stitch markers
Yarn
Infinity Hearts Lily made of 70% Cotton, 30% SW Merino Wool. Yarn length 50g = approx. 100m.
I have used the colour no 12: Light Green
Yarn consumption
450 (500) 550 (650) 750 (850)g
Abbreviations
St = Stitch
Ch = Chain
Sl st = Slip Stitch
Dc = Double crochet
Htr = Half Treble
Tr = Treble
BLO = Back Loop Only
Instructions
Sleeve 1:
1: Work 108(111)111(111)115(115) ch, 1st st from the hook 5 dc, place stitch marker, 55(58)58(58)62(62) tr, place stitch marker, 21 htr, place stitch marker,16 dc, place stitch marker, 10 sl st, 1 ch, turn.
You now crochet in blo
*
2: 10 sl st blo, 16 dc blo, 21 htr blo, 55(58)58(58)62(62) tr blo, 5 dc blo, turn.
3: 1 ch, 5 dc blo, 55(58)58(58)62(62), tr blo 21 htr blo, 16 dc blo, 10 tog blo, 1 ch, turn. *
Now you change between row *2-3* until you have
XS:19 S:23 M:25 L:31 XL:35 XXL:37
Rows in total. You should ALWAYS end the rows up in the sl st (the collar). Now you have finished the first sleeve, and you now need to move on to the front piece.
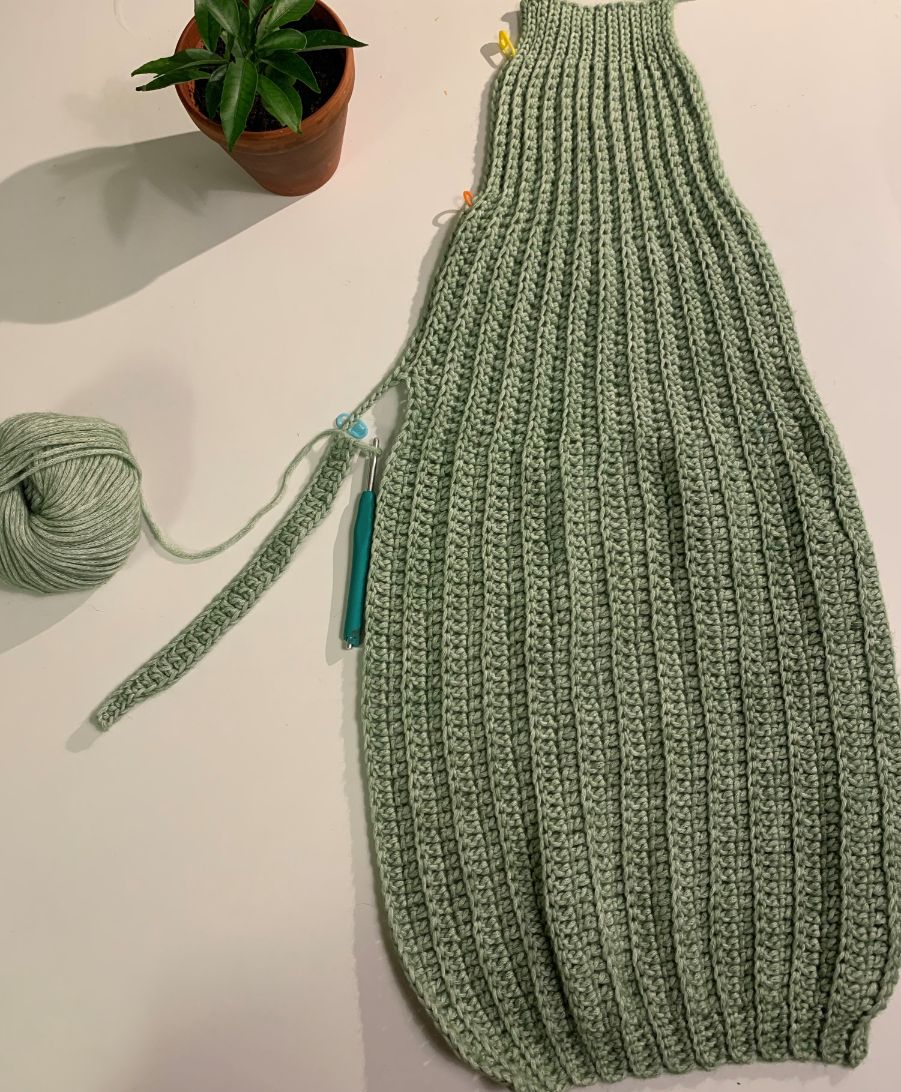
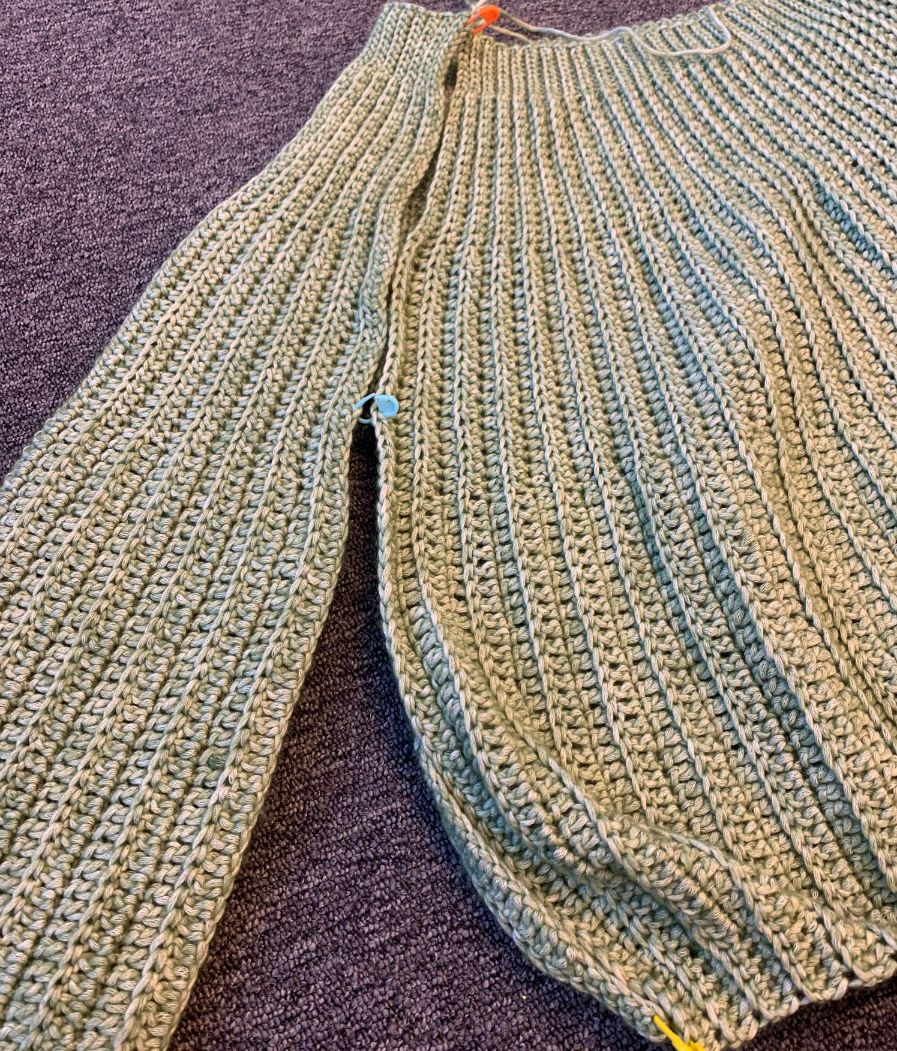
The picture shows the first sleeve and the start of the front piece.
Front piece:
1: 10 sl st blo, 16 dc blo, 14(14)14(18)20(20) htr blo, 1 htr - be sure to work through both stitch loops here, as it makes it easier to make ch for the front piece later.
Ch 41(41)41(50)53(53), turn.
2: 1 st from the hook, 5 dc, 29(29)29(36)39(39) st, 5(5)5(9)11(11) htr, 16(16)16(12)10(10) htr blo, 16 dc blo, 10 tog blo, 1 ch, turn.
*3: 10 sl st blo, 16 dc blo, 21(21)21(29)29(29) htr blo, 29(29)29(36)39(39) tr blo, 5 dc blo, turn.
4: 1 ch, 5 dc blo, 29(29)29(36)39(39) tr blo, 2129(29) htr blo, 16 dc blo, 10 sl st blo, 1 ch, turn. *
You now switch between row *3-4* until you have
XS:40 S:43 M:47 L:51 XL:55 XXL:61
Rows in total.
You should ALWAYS end the rows up in the sl st (the collar). You have now finished the front piece, and you now need to move on to the second sleeve.
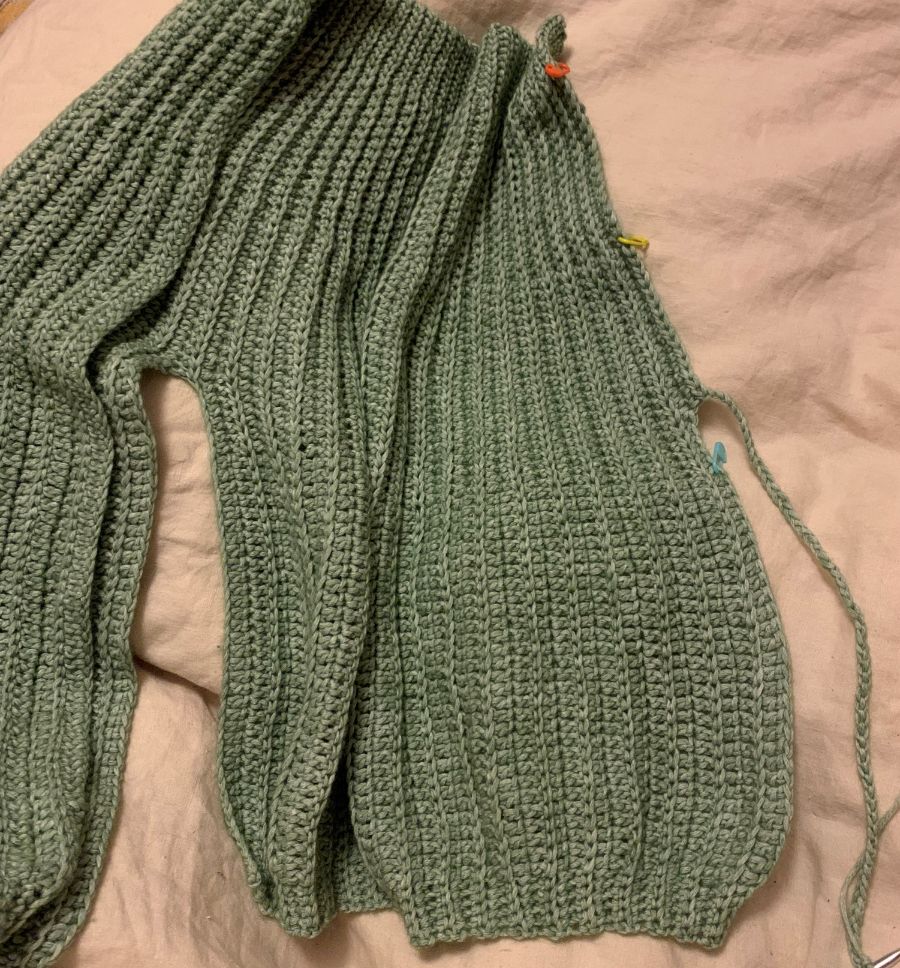
The picture shows how it should look when casting on stitches for the second sleeve
Second sleeve:
1: 10 sl st blo, 16 dc blo, 14(14)14(18)20(20) htr blo, 1 htr - be sure to work through both stitch loops here, as it makes it more stable for making ch for the front piece later. Ch 7(70)70(70)68(68), turn.
2: 1 st from the hook, 5 dc, 55(58)58(58)62(62) st, 6(6)6(10)11(11) htr, 15(15)15(11)10(10) htr blo, 16 dc blo, 10 sl st blo, 1 ch, turn.
*
3: 10 sl st blo, 16 dc blo, 21 htr blo, 55(58)58(58)62(62) st blo, 5 dc blo, turn.
4: 1 ch, 5 dc blo, 55(58)58(58)62(62) tr blo, 21 htr blo, 16 dc blo, 10 sl st blo, 1 ch, turn. *
You now switch between row *3-4* until you have
XS:19 S:23 M:25 L:31 XL:35 XXL:37
Rows in total.
You should ALWAYS end the rows up in the sl st (the collar). Now, you have finished the second sleeve, and you now need to move on to the back piece.
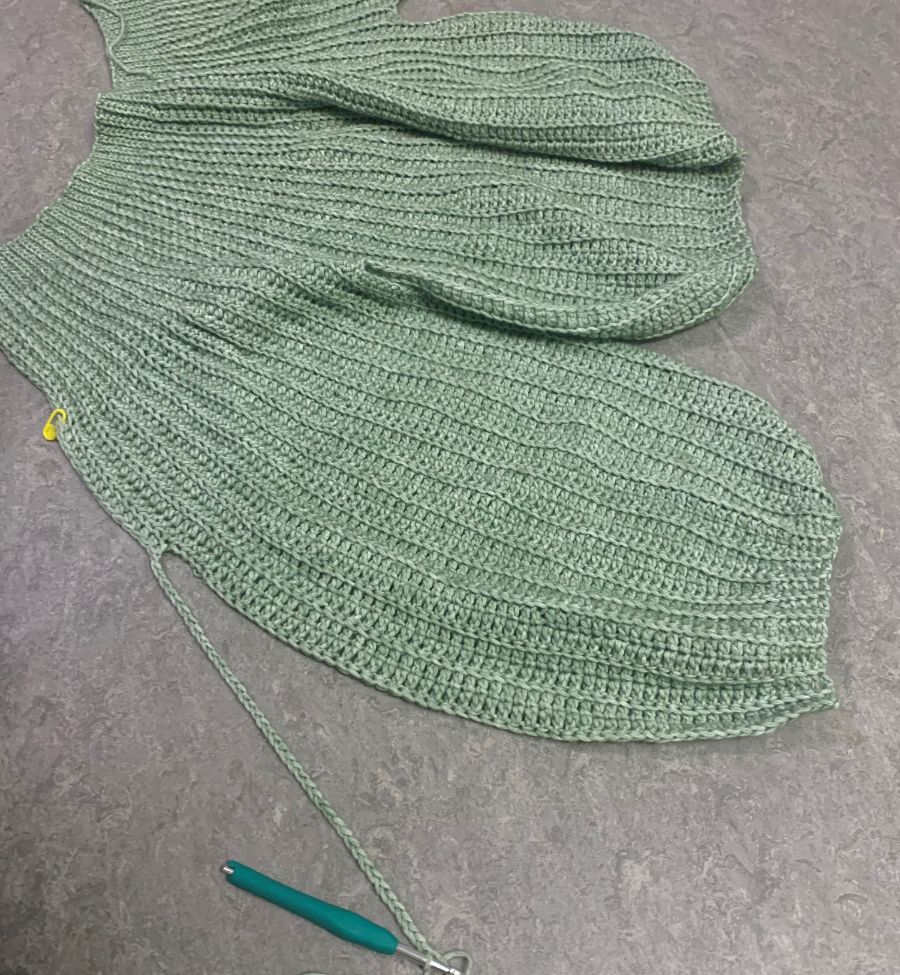
The picture shows the transition to the back piece
Back piece
Make sure to leave a long tail of yarn that you can use for sewing when you begin assembling the different parts of the jumper, once you have finished the back piece.
1: 10 sl st blo, 16 dc blo, 14(14)14(18)20(20) htr blo, 1 htr - be sure to work through both stitch loops here, as it makes it more stable for making ch for the back piece later. Ch 1(41)41(50)53(53), turn.
2: 1 st from the hook, 5 dc, 29(29)29(36)39(39) tr, 5(5)5(9)11(11) htr, 16(16)16(12)10(10) htr blo, 16 dc blo, 10 sl st blo, 1 ch, turn.
*
3: 10 sl st blo, 16 dc blo, 21(21)21(29)29(29) htr blo, 29(29)29(36)39(39) st blo, 5 dc blo, turn.
4: 1 ch, 5 dc blo, 29(29)29(36)39(39) st blo,21(29) htr blo, 16 dc blo, 10 sl st blo, 1lm, turn. *
You now switch between row *3-4* until you have:
XS:40 S:43 M:47 L:51 XL:55 XXL:61
Rows in total.
The rows should ALWAYS end up in sl st (the collar). You are now done with the back piece, and you now start to sew all the parts together
Sewing the pieces together:
Now you sew the jumper together. You choose which side you want to use as the right side - this is just a matter of preference. Sew the jumper together on the ’wrong side’ and turn out the right side afterwards. I crocheted mine together with sl st, but if you prefer to sew, that's just fine.
Sew 10 sl sts together, 16 dc, 15 (15) 15 (19) 20 (20) htr, then continue to sew the front piece to the back piece. Weave in the yarn end. Attach the yarn at the start of the sleeve and sew the sleeve together until it meets the front and back piece. Weave in the ends.
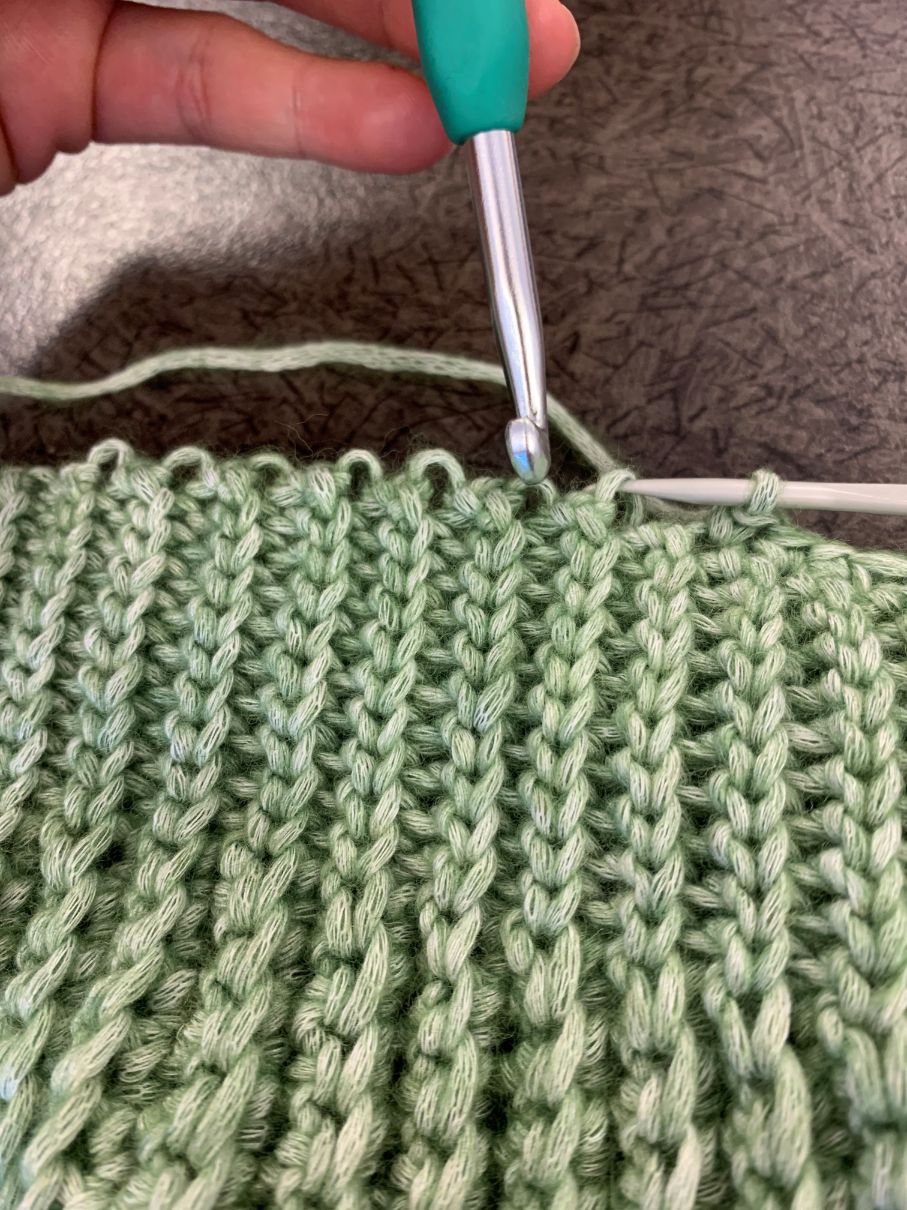
Attach yarn to the bottom of the jumper and sew the front and back piece together until you reach the sleeve. There you sew the sleeve together all the way to the bottom and weave in the end. Turn the jumper right side out. Now you crochet a round of dc around the collar. The picture below shows which stitches you should use to create a nicer finish on the neck. The number of dc is different, depending on what size you are making.
Now, your jumper is finished and you can start wearing it! Feel free to use the hashtag #lysesweater so I can see your version! Also use the hashtag #ritohobby and #infinityheartslily so more people can see your finished result.
Design by: Lisette Lannerhag Design
 Österreich
  Belgique
  Bosna i Hercegovina
  България
  Κύπρος
  Česká republika
  Danmark
  Eesti
Eesti  Føroyar
  Suomi
Suomi  France
  Deutschland
  Ελλάδα
  Kalaallit Nunaat
  Magyarország
  Ísland
  Ireland
  Italia
  Latvija
  Liechtenstein
  Lietuva
  Lëtzebuerg
  Malta
Malta  Isle of Man
  Nederland
  Norge
Norge  Polska
  Portugal
  România
  Slovensko
  Slovenija
  España
  Sverige
  Schweiz
  Ukraїna
  United Kingdom