Free crochet pattern Christmas tree in fabric yarn
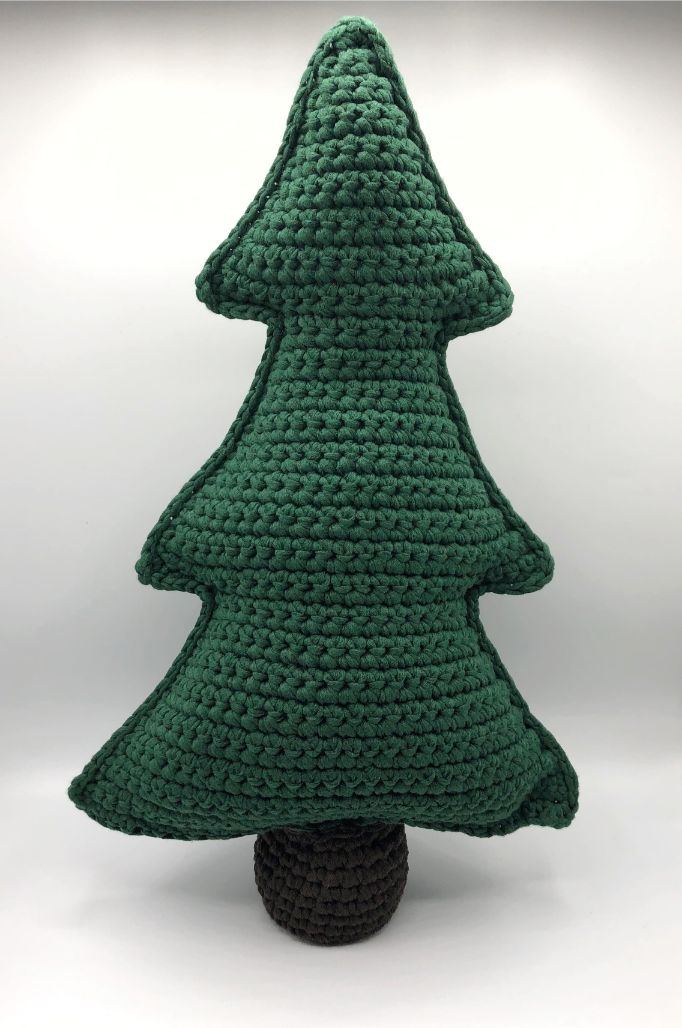
You can crochet this lovely Christmas tree by following the pattern below. You will need Infinity Hearts Ribbon fabric yarn as well as wadding and plastic granules. Plastic granules help provide some weight to the tree, so it can stand without tipping over. You can find the full material list below, which includes the other materials and quantity.
Measurements
Approx. 50 cm in height
Materials
- Crochet hook size 6.00 mm or the size that fits the tension.
- approx. 150 Wadding/Stuffing
- approx. 150 grams: Plastic Granules
- approx. 300 grams: Infinity Hearts Ribbon Fabric Yarn 14 Bottle Green
- approx. 40 grams: Infinity Hearts Ribbon Fabric Yarn 10 Dark Brown
Abbreviations
s - stitch
tog - together
rw - row
rd - round
mr - magic ring
ch - chain stitch
sl st - slip stitch
dc - double crochet
dec - decrease (2 stitches together)
inc - increase (2 stitches in the same stitch)
bl – back loop
() – number of stitches
** - repeat what is specified between the two **
X - times x number of times
Instructions
The tree itself
Make 2.
1st tip
Begin with 2 ch
Rw. 1: 1 dc in first ch (1)
Rw. 2nd: 3 dc in tog s (3)
Rw. 3rd: 1 dc in each s (3)
Rw. 4: inc, 1 dc, inc (5)
Rw. 5: 1 dc in each s (5)
Rw. 6: inc, 3 dc, inc (7)
Rw. 7: 1 dc in each s (7)
Rw. 8: inc, 5 dc, inc (9)
Rw. 9: 1 dc in each s (9)
Rw. 10: inc, 7 dc, inc (11)
Rw. 11: 1 dc in each s (11)
Rw. 12: inc, 9 dc, inc (13)
Rw. 13: 1 dc in each s (13)
Rw. 14: inc, 11 dc, inc (15)
Rw. 15: 1 dc in each s (15)
Rw. 16: inc, 13 dc, inc (17)
Rw. 17: 1 dc in each s (17)
2nd tip
Rw. 18: 4 sl st, 9 dc (9)
Rw. 19: inc, 7 dc, inc (11)
Rw. 20: 1 dc in each s (11)
Rw. 21: inc, 9 dc, inc (13)
Rw. 22: 1 dc in each s (13)
Rw. 23: inc, 11 dc, inc (15)
Rw. 24: 1 dc in each s (15)
Rw. 25: inc, 13 dc, inc (17)
Rw. 26: 1 dc in each s (17)
Rw. 27: inc, 15, inc (19)
Rw. 28: 1 dc in each s (19)
Rw. 29: inc, 17 dc, inc (21)
Rw. 30: 1 dc in each s (21)
Rw. 31: inc, 19 dc, inc (23)
Rw. 32: 1 dc in each s (23)
Rw. 33: inc, 21 dc, inc (25)
Rw. 34: 1 dc in each s (25)
3rd tip
Rw. 35: 4 sl st, 17 dc (17)
Rw. 36: inc, 15 dc, inc (19)
Rw. 37: 1 dc in each s (19)
Rw. 38: inc, 17 dc, inc (21)
Rw. 39: 1 dc in each s (21)
Rw. 40: inc, 19 dc, inc (23)
Rw. 41: 1 dc in each s (23)
Rw. 42: inc, 21 dc, inc (25)
Rw. 43: 1 dc in each s (25)
Rw. 44: inc, 23 dc, inc (27)
Rw. 45: 1 dc in each s (27)
Rw. 46: inc, 25 dc, inc (29)
Rw. 47: 1 dc in each s (29)
Rw. 48: inc, 27 dc, inc (31)
Rw. 49: 1 dc in each s (31)
Rw. 50: inc, 29 dc, inc (33)
Rw. 51: 1 dc in each s (33)
After the first piece, bind off, cut yarn and weave in ends.
After you have finished the second piece, join the two pieces and crochet with dc all the way around the sides leaving the bottom open. Make 2 dc in same s at the bottom of tip and 3 dc in same s at the peak of the tip. Make 4 dc on the top of the tree. Make sure to place the two parts so that the sides where you made the sl st meet, otherwise it will be crooked.
Add a little stuffing as you go to make sure you get it in all the tips. Don't stuff the bottom part entirely just yet.
Break yarn and weave in ends.
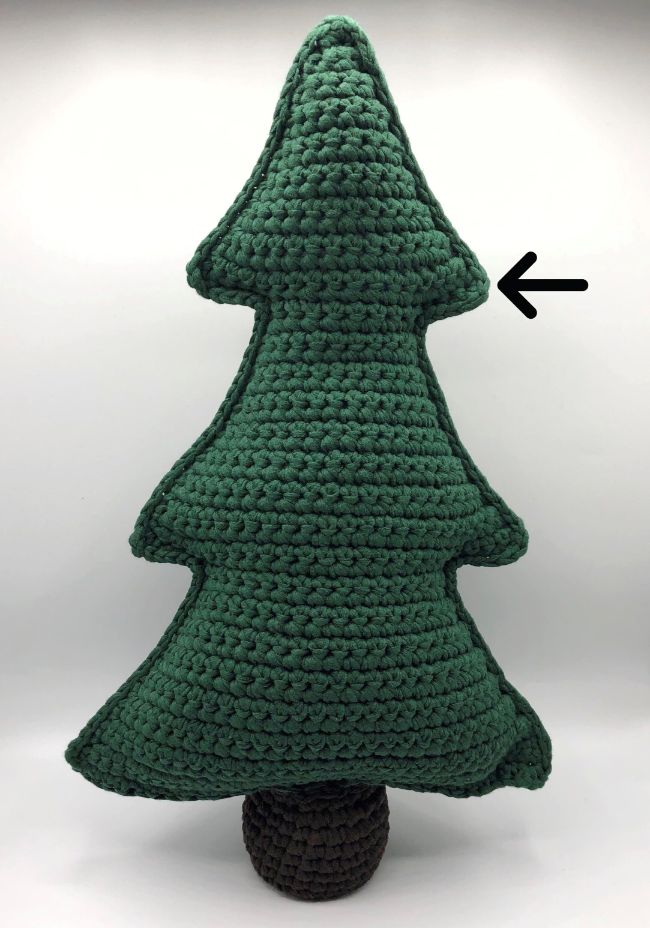
The photo below illustrates what is meant by the bottom of the tip
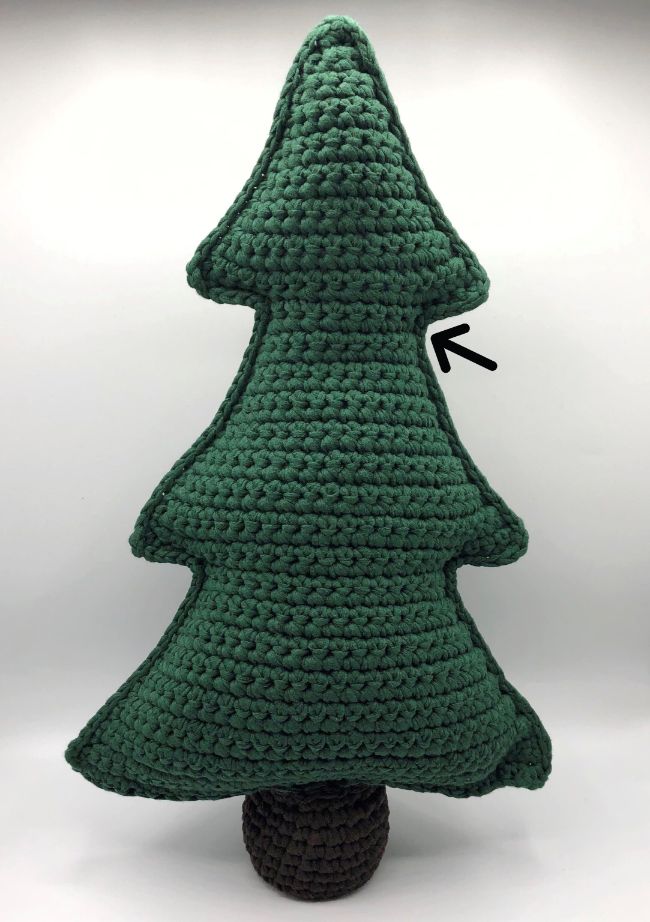
The photo below illustrates what is meant by the peak of the tip
The bottom of the tree
Begin with 2 ch
1. 1 dc in 1. ch (1)
2. 1 dc (1)
3. inc (2)
4. 1 dc in each s (2)
5. inc, 1 dc (3)
6. 1 dc in each s (3)
7. 1 dc in each s (3)
8. inc, 2 dc (4)
9. 1 dc in each s (4)
10. 1 dc in each s (4)
11. inc, 3 dc (5)
12. 1 dc in each s (5)
13. 1 dc in each s (5)
14. inc, 4 dc (6)
15. 1 dc in each s (6)
16. 1 dc in each s (6)
17. 1 dc in each s (6)
18. 1 dc in each s (6)
19. 1 dc in each s (6)
20. 1 dc in each s (6)
21. dec, 4 dc (5)
22. 1 dc in each s (5)
23. 1 dc in each s (5)
24. dec, 3 dc (4)
25. 1 dc in each s (4)
26. 1 dc in each s (4)
27. dec, 2 dc (3)
28. 1 dc in each s (3)
29. 1 dc in each s (3)
30. dec, 1 dc (2)
31. 1 dc in each s (2)
32. dec (1)
33. 1 dc (1)
Bind off, but don’t cut the yarn.
Now, crochet the bottom on the tree with dc all the way around the bottom make 3 dc in each tip. Be sure to stuff the tree entirely before closing the bottom.
Bottom of the tree
Rd. 1: 6 dc in mr (6)
Rd. 2: *inc* x 6 (12)
Rd. 3: *1 dc, inc* x 6 (18)
Rd. 4: *2 dc, inc* x 6 (24)
Rd. 5: 1 dc in each s in bl (24)
Rd. 6-12: 1 dc in each s (24)
Bind off and cut the yarn.
Put plastic granules in a nylon stocking and tie a knot on the stocking. Insert the stocking into the trunk of the Christmas tree and attach the trunk on the tree. Remember to place the trunk at the middle so that the tree will be able to stand.
If you want to use the tree as a pillow, you can use stuffing for the trunk instead of the plastic granules, but then it won’t be able to stand.
Designed by: Kreatosse (Majken Andreasen)
 Österreich
  Belgique
  Bosna i Hercegovina
  България
  Κύπρος
  Česká republika
  Danmark
  Eesti
Eesti  Føroyar
  Suomi
Suomi  France
  Deutschland
  Ελλάδα
  Kalaallit Nunaat
  Magyarország
  Ísland
  Ireland
  Italia
  Latvija
  Liechtenstein
  Lietuva
  Lëtzebuerg
  Malta
Malta  Isle of Man
  Nederland
  Norge
Norge  Polska
  Portugal
  România
  Slovensko
  Slovenija
  España
  Sverige
  Schweiz
  Ukraїna
  United Kingdom